Overview
There are a few steps that you need to follow before you get the integrated setup up and running, mainly due to a constraint violation issue in OSGi bundles. In other words, a third party jar comes in and exports one package with same name and version (like javax.jms; version=0.0.0) that is already exported by the existing bundles of the WSO2 ESB OSGi environment. More specifically, the recommended weblogic client, 'wlfullclient.jar' provides its own implementation of some 'javax' packages which conflicts with the implementations provided in WSO2 Carbon Environment.Now back to those steps I was mentioning... It goes like this.
- Setup the proper setup in Weblogic
- Apply the patch (if ESB version <= 4.6.0), and apply your preferred method of resolving the OSGi package conflicts
- Provide the proper configuration in ESB
Actually, the step in the middle is the important one... So you are free to concentrate on that only if you are bored to read through all the uninteresting configuration details.
The Weblogic Setup
Our goal in this example, my dear children... ahem..
Anyways, what we are attempting here is to use Weblogic as a simple JMS provider which provides the JMS queue for the WSO2 ESB message store. To that you need to create a connection factory first, and then a JMS queue. This example uses Oracle Weblogic 10.3.4 as the server.
Anyways, what we are attempting here is to use Weblogic as a simple JMS provider which provides the JMS queue for the WSO2 ESB message store. To that you need to create a connection factory first, and then a JMS queue. This example uses Oracle Weblogic 10.3.4 as the server.
Setup a Weblogic Connection Factory and Queue
1. Start the weblogic server and login to the console. Default URL is http://localhost:7001/console
2. Create a new JMS server by going to Home -> Services -> Messaging -> JMS Servers -> New.
 |
| Create a new JMS Server |
3. Click Next. Set the target as AdminServer and finish creating the JMS Server.
4. Create a new JMS module by Home -> Services -> Messaging -> JMS Modules -> New
5. Give a name of your preference and set the target as AdminServer.
6. Click the newly created JMS module and click on the Subdeployments tab. Create a new subdeployment named 'jms'. Set the target for the subdeployment as the newly created JMS Server.
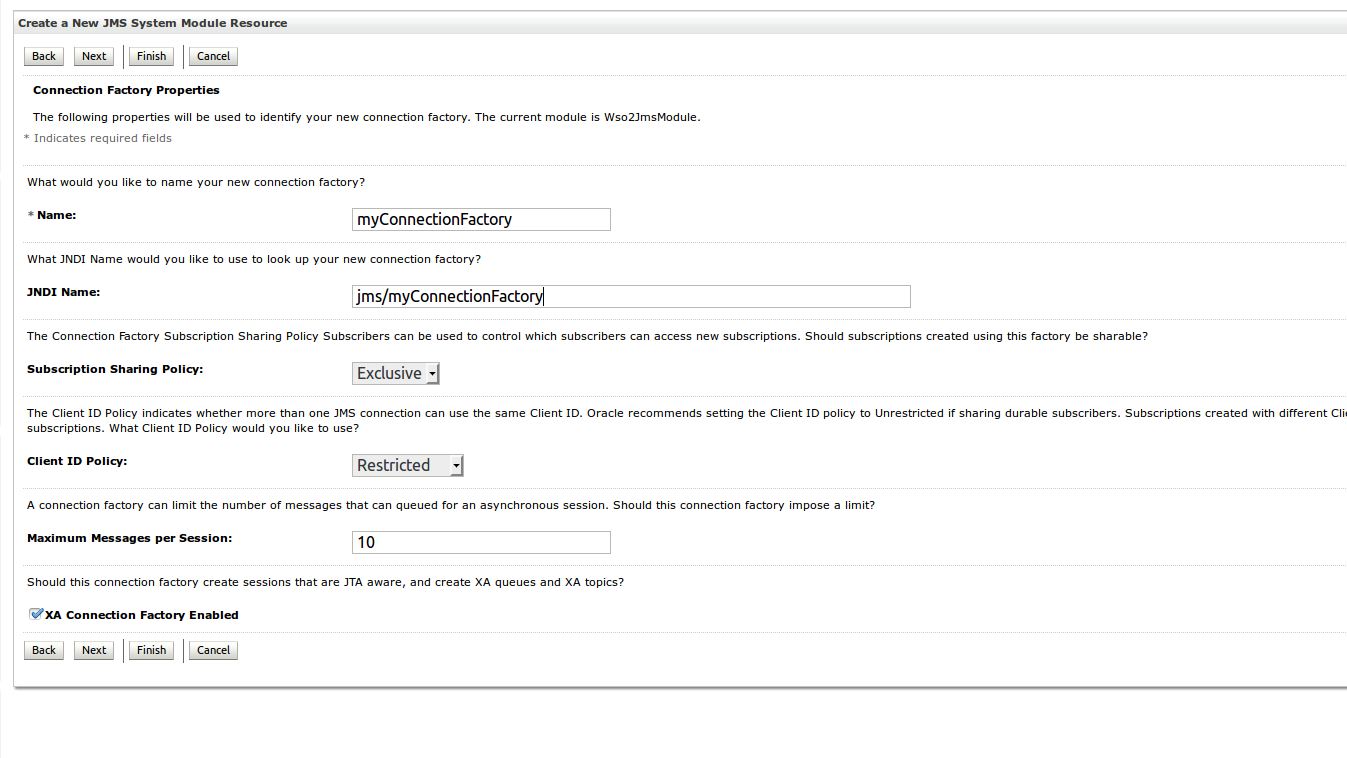
7. Create a new Connection factory inside the JMS module and provide the JNDI name 'jms/myConnectionFactory'
 |
| Add a new JMS Connection Factory |
8. Click next and go to 'Advanced Targeting' to select the subdeployment and target server properly and click Finish.
 |
| Set the subdeployment and target |
9. Now go to the JMS module again and click New -> Queue to create a JMS queue. The name should be 'wso2MessageQueue' and the JNDI name should be 'jms/wso2MessageQueue'. Select the subdeployment as 'jms' and target as 'Wso2JmsServer'.
10. At the end of successful creation of a connection factory and a queue, your 'Wso2JmsModule' should have the 'myConenctionFactory' and 'wso2MessageQueue' entries as following. (Please disregard the additional entries. These were created during testing for various other configurations)
 |
| Listing of connection factory and queue |
Now we are finished configuring the Weblogic server. Now let's go to the interesting part of hacking the weblogic client jar and patching the ESB for this to work properly.
Hack and patch to get it working
1. First of all you need to add the following patched jar to ESB_HOME/repository/components/plugins.
(Or if you like to do it as a proper patch, create a directory named 'patchXXXX', say 'patch0060' and then put the jar inside that directory and copy the directory to repository/components/patches. Now starting the server with -DapplyPatches flag will ensure the patch is applied in a proper manner, where you can revert if needed)
[ On a side note, am told that if you do not apply the patch in the recommended manner, you might have to spend the rest of your life wondering whether it was right or wrong to use that shortcut patching strategy. So you better apply that patch right!]
[ On a side note, am told that if you do not apply the patch in the recommended manner, you might have to spend the rest of your life wondering whether it was right or wrong to use that shortcut patching strategy. So you better apply that patch right!]
2. You need to stop exporting conflicting packages from the weblogic client jar. The recommended way to connect to weblogic is by using the full client. The following post is an excellent guide to generating the required jar.
After generating the client jar, there are two ways to stop exporting the conflicting packages.
2 (a) The Quick and Dirty Method - Remove the packages from the archive
Yup, that's right! Simply open the jar and delete the javax/jms folder and javax/xml/namespace folder. Pretty easy and simple, right?
2 (b) Wrap the jar as a proper OSGi bundle and stop exporting the conflicting packages.
This is a cleaner method, but you'll have to sweat a bit more. To do this, first you'd have to create a maven module and put the wlfullclient.jar to 'src/main/resources' of the project directory. Use the pom available here to build the jar. The pom is quite long (~1800 lines), so forgive me for not including it here in an already lengthy blog post.
Now when you run 'mvn clean install', the proper OSGi bundle will be generated (Hopefully!).
IMPORTANT:
- If you followed 2(a), put the modified 'wlfullclient.jar' to ESB_HOME/repository/components/lib
- If you followed 2(b), put the generated 'wlfullclient-1.0.0.jar' to ESB_HOME/repository/components/dropins
Now our patching and hacking is complete. All that is left to do is configure the ESB.
Configuring the ESB
To configure the ESB properly follow the steps as below.
1. Set the transport receiver configuration as below in ESB_HOME/repository/conf/axis2/axis2.xml
Loading ....
3. Verify that no error messages pop-up at startup and login to the ESB management console. (If it does, verify the steps above ... and tap into your inbuilt technical ingenuity a bit to troubleshoot... ;-))
4. Create a new JMS message store. Go to Main -> Service Bus -> Message Stores -> Add Message Stores tab -> Add JMS Message Store. Enter a name, the Initial Context Factory, Provider URL and other additional parameters. Your source view after entering all the details should look like the following.
4. Create a new JMS message store. Go to Main -> Service Bus -> Message Stores -> Add Message Stores tab -> Add JMS Message Store. Enter a name, the Initial Context Factory, Provider URL and other additional parameters. Your source view after entering all the details should look like the following.
 |
| WSO2 ESB Message Store Config |
The configuration is given below. Please take note of the parameter "vender.class.loader.enabled". Without this parameter, your creation of the message store will fail (And yes, the spelling mistake in 'vender' is intentional...., though it was unintentional when writing the code... :-))
Also, the ESB editor might not show this parameter after reloading the editor. So take care to add it manually each time if you edit the message-store config, if it is already not there in the editor.
Also, the ESB editor might not show this parameter after reloading the editor. So take care to add it manually each time if you edit the message-store config, if it is already not there in the editor.
Loading ....
Save the message store. This should query the Weblogic server and display the current messages in queue.
5. Now to test our message store... You can send messages to the created store using a proxy configuration similar to the following.
Loading ....
Send a message using the 'TryIt' service. Use XML messages.
6. Finally, if all things went well, you should it be able to view the message you sent inside the management console itself by Main -> Service Bus -> Message Stores -> Available Message Stores tab -> 'wso2MessageStore' and click Show envelope of the desired message.
 |
| JMS Message viewed through WSO2 ESB Managment Console |
That's all there is. If you encounter any issues in following the above steps, do ping me or put a comment. (And do forgive my horrid sense of humour...)
No comments:
Post a Comment